Figure: 2.1a
|
Back Unit One
|
Home Cover Page
|
Top Unit Two
|
Next Unit Three
|
Unit Two: Pressure
Starter Activity:
Elicit students’ idea about pressure. It is a word they all know and use. They might have a commonsense idea of what pressure is. Let students state the difference between pressure and force. You can also use the following example as a starter:
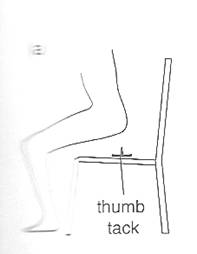
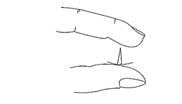
It matters which way up a thumb tack (a drawing pin) is when you sit on it. In this section we see how the effect of a force depends on the area over which it is applied. The effect of sitting on a thumb tack is much greater in figure 2.1a than it is in figure 2.1b.In each case the force is the same, but the area of contact is much smaller in figure 2.1a than it is in figure 2.1 b.
Figure: 2.1a
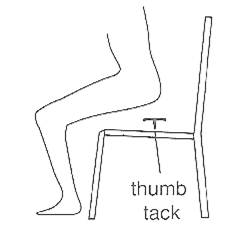
Figure: 2.1b
Relate this example with tractors having wide tyres of large diameter to prevent the wheels from sinking far into soft ground. The wide tyres spread the weight of the tractor over as large an area as possible.
Main Activity:
Let students in groups try this activity: A flat, square piece of wood of area 1cm2 is placed on damp sand and a force of 10 N is applied to the top of it. This creates an indent (mark in the surface of something) in the sand .Then take another square wooden piece of area 4 cm2, and a force of 10N is applied. This time, the indent is less deep .If the force is increased to 40N; the dents are about the same. That is a force of 40N spread over an area of 4 cm2 has the same effect as the force of 10N spread over 1cm2.
A special name is given to the force acting on unit area. It is called the pressure: Perpendicular contact force divided by the surface area over which the force acts.
![]()
P = F/A
P = pressure
F=force
A=surface area
Units: Pascal (Pa), Newton/meter2
The Pascal is an SI unit for pressure; one Pascal equals one Newton per square meter.
A pressure of 1 Pa is a small pressure. It is the weight of about 100g spread over the area of 1m2 .Sometimes a larger unit, N/ cm2 is used. Because there are 10000 cm2 in 1m2.
1Pa=1N/m2
1N/cm2 =10 000Pa
Stress the fact that pressure is a scalar, not a vector. Make a clear distinction between force and pressure. There is no direction associated with pressure, but the direction of the force associated with the pressure is perpendicular to the surface upon which it is acting. Thus it is incorrect to say, for example, that the pressure at the bottom of a beaker of water acts downwards on the bottom of the beaker or that pressure in a fluid acts in all directions. It is the force which is associated with the pressure which is the vector quantity and acts in a particular direction. Thus the water exerts a downward force on the bottom of the beaker as a result of the force of gravity acting on the water; at a particular point in a fluid the forces exerted by the water is the same in all directions, i.e. the resultant force is zero.
As an illustration of the distinction between pressure and force, let students in groups try this simple activity: consider the two blocks in Figure below. The blocks are identical, but one stands on its end and the other on its side. Assume the two blocks stand on a mattress, so that you can observe the amount of distortions produced. Both blocks are of equal weight and therefore exert the same force on the surface, but the upright block exerts a greater pressure against the surface. If the block were tipped up so contact is on a single corner, the pressure would be greater still.
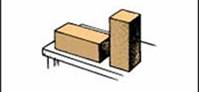
Figure: 2.2: Although the weight of both blocks is the same, the upright block exerts greater pressure against the table.
Invite students for discussion and elicit their arguments on this question: Suppose you are standing directly behind a young lady who steps back and accidentally stamps on your foot with the heel on one shoe. Would you feel better of the person if that person were:
Assist and support students in releasing that spike-heeled shoes concentrate almost all the weight of the lady over a very small surface area, and can exert a pressure large enough to damage or cause pain.
Concluding Activity: Recapitulating the core points of the lesson provide the class with a quiz and have quick check to see if they have understood the concepts introduced in the lesson. If students have trouble with the quiz, let them reread their textbook, ask their teacher for help, or discuss the material with a fellow student. A simple and yet useful and helpful quiz may look like:
Q1. Stand on a weigh scale and read your weight. When you lift one foot off so you're standing on one foot, does the reading change? Does a scale read force or pressure?
Q2. You know that a sharp knife cuts well than a dull knife. Do you know why this is so?
Q3. A thumb tack is squeezed between the finger and the thumb as shown in the figure. Figure. Which experience the greater pressure, the thumb or the finger? Be careful not to hut yourself!
Confirm students’ understanding by comparing their replies with the following correct answers:
Starter Activity: Begin this lesson with a revision on previous lesson and students’ common experience in swimming.
A liquid contained in a vessel exerts forces against the walls of the vessel. To discuss the interaction between the liquid and the walls, it is convenient to apply the concept of pressure.
You experience pressure when you swim. If you dive deep under the water, you can feel the water pushing against you with more pressure, more force per square meter of your body. The deeper you swim, the greater the pressure. What causes this pressure? It is simply the weight of the fluids directly above you—water plus air—pushing against you. As you swim deeper, there is more water above you. Therefore there's more pressure. If you swim twice as deep, there is twice the weight of water above you, so the water's contribution to the pressure you feel is doubled. Because air pressure near the Earth's surface is nearly constant, the pressure you feel under water depends only on how deep you are.
Main Activity: Students have a common misconception that liquid pressure depends on surface area. Remove this misconception using an investigation experiment approach.
Let students observe water squirting out from a container through holes at different depths. Students need to make inferences, propose a hypothesis and plan an experiment to verify the hypothesis. First let the teacher show the demonstration and then assign students to carry out the activity in groups.
Use a hammer and a nail to make three holes of the same size in the side of the can .Hold a piece of wood inside the can where you are making the holes. This helps you to make the holes lie in a vertical line but at different distances from the bottom.
Fill the can with water, and watch the water flow out of the holes.
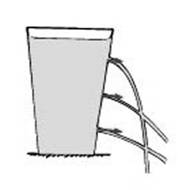
Figure: 2.3 Water pressure acts perpendicular to the sides of a container, and increases with increasing depth.
Demonstrate also the following simple activity to show the direction of the pressure:
Use a plastic bag without any holes in it. Fill it with water and tie up the opening so that water cannot get out.
Stick a pin through the bag, and gently squeeze the bag .The pressure causes the water to flow out and it comes out at right angles to the surface even if the hole is on the top surface of the bag. Put in more holes in different positions and observe.
Notice that when liquid presses against a surface, there is a net force directed perpendicular to the surface. Although pressure doesn't have a specific direction, force does.
Concluding Activity:
Provide assistance and guide students to arrive at the following concluding remarks:
The pressure pushes the water out of the holes. The water comes out fastest from the lowest hole, where the depth of water is greatest. This implies the pressure is greatest where the depth of water is greatest. Notice also that the water comes out of the holes at right angles to the surface of the can before gravity pulls it downwards. It curves downward due to gravity
Starter Activity: We use the concept of forces in equilibrium to derive the equation for pressure in a liquid. The liquid is assumed to have a uniform density ρ, no matter what its depth.
Main Activity: The figure2.3 below shows a liquid in a container. The column of water extends from the surface of the liquid down to the depth where the pressure is to be determined. It has height h and its bottom surface has area A. The mass of the liquid in the column is m.
In a container of liquid, the pressure at any point results from the weight of the liquid above that point and the weight of the atmosphere, assuming that the container is open to the atmosphere. The pressure resulting from the weight of the liquid alone is known as the gauge pressure. So the actual pressure at a particular point in a liquid is equal to the gauge pressure plus the atmospheric pressure. In practice, even though it may not be explicitly stated, it is the gauge pressure which is normally in question.
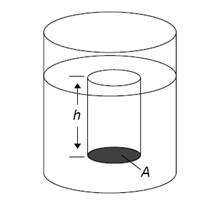
Figure: 2.4 pressure at a depth in a liquid
Two forces act on the column. The pressure P of the liquid below the column presses up on its bottom surface with a force PA. Gravity acting on its mass pulls it down; the magnitude of this force is the column’s weight, mg. We assume that the liquid is static, so we know that the column is not accelerating in any direction.
Variables:
| mass of column | m |
| acceleration of gravity | g |
| pressure on bottom surface | P |
| area of bottom surface | A |
| density of liquid | ρ |
| height of column | h |
Strategy:
Since the column is not accelerating, the net force acting on it must be zero. This means the forces acting on it must sum to zero.
Use the definitions of density, weight and volume to rearrange and simplify the equation that sums the forces to zero.
Physics principles and equations: The pressure P on the area A is due to the weight of the liquid above it.
Newton’s second law
ΣF = ma
The definitions of pressure and weight
P = F/A (weight = mg)
The definition of density
ρ = m/V
The volume of the column equals the area of its base times its height
V=Ah
Step-by-step derivation
Since the column of liquid is not accelerating, Newton’s second law implies that the upward and downward forces on it are equal
1.ΣF = ma = 0 Newton’s 2nd law; column not accelerating
PA + (–mg) = 0 definitions of pressure and weight
PA = mg rearrange
PA = (ρAh)g definition of density
P = ρgh gauge pressure
Pactual =Pgauge +Patm = ρgh + Patm
It is important to note that only the depth below the surface of the liquid of density is involved; the shape of the vessel and the area of the liquid surface are not involved in the pressure at all.Therefore, the factors on which pressure in a liquid at rest depends on are density of the liquid, acceleration due to gravity, and depth of the liquid.
Concluding Activity: A few words on the units of pressure are in order. We have stated that the units of pressure are N/m2. This combination of units is given a name. It is called the Pascal, abbreviated Pa.
1 Pa = 1N/m2
Pressures are often quoted in terms of the non-SI unit of pressure, the atmosphere, abbreviated atm and defined such that, on the average, the pressure of the earth’s atmosphere at sea level is 1 atm. In terms of the Pascals,
1 atm = 1.013×10⁵ Pa
The big mistake that students make in applying equation ( P = P0 + ρgd) is to ignore the units. They’ll use 1 atm for P0 and without converting that to Pascals; they’ll add the product ρgh to it. Of course, if one uses SI units for ρ, g, and h, the product ρgh comes out in N/m2 which is a Pascal which is definitely not an atmosphere (but rather, about a hundred-thousandth of an atmosphere). Of course one can’t add a value in Pascals to a value in atmospheres. The way to go is to convert the value of P0 that was given to you in units of atmospheres, to Pascals, and then add the product ρgh (in SI units) to your result so that your final answer comes out in Pascals.
To confirm whether students distinguish the difference between gauge pressure and absolute pressure; let them solve the following problem in 5 minutes.
What is the gauge pressure inside the bottom of the tank due to the weight of the water alone? What is the absolute pressure, including atmospheric pressure, pressing down inside the bottom?
Starter Activity:
Start the lesson with a short summary of the previous lesson as-the hydrostatic pressure in a liquid depends only on the depth and the pressure at the surface .We see some important implications of this observation. The equation:
Pactual =Pgauge +Patm = ρgh + Patm
Implies that, if the pressure on a liquid is increased, perhaps by fitting a piston and pressing it down, the pressure at any depth in the liquid will increase by the same amount. This is the basis of Pascal’s principle.
Main Activity: An enclosed fluid transmits pressure unchanged. Here you see two blocks of differing masses. The same fluid supports both masses in a state of equilibrium. Why? Because the pressure is the same underneath both masses. The more massive block exerts more downward force than its counterpart, but it exerts it over a proportionally greater area. This means the pressure is the same on both sides
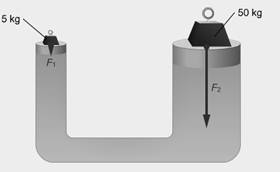
Figure: 2.5 An enclosed fluid transmits pressure unchanged
Fluids transmit pressure uniformly in all directions. Since the system is in equilibrium, the downward pressure exerted on the fluid by the small block equals the upward pressure exerted by the fluid on the large block. The fluid also exerts pressure on the sides of the hydraulic system.
Concluding Activity: We can draw a conclusion from the hydrostatic pressure equation-
P=P0+ ρgd
Where:
P is the absolute pressure,
P0 is atmospheric pressure
Pg = ρgd is the gauge pressure, and
If we change the pressure P0 at the surface to P1 ,the pressure at depth d becomes
P’=P0+ ρgd
The change in pressure ![]() is the same at all points in the fluid, independent of the size or shape of the container? This idea, that a change in pressure at one point in an incompressible fluid appears undiminished at all points in the fluid, and is called Pascal’s principle.
is the same at all points in the fluid, independent of the size or shape of the container? This idea, that a change in pressure at one point in an incompressible fluid appears undiminished at all points in the fluid, and is called Pascal’s principle.
This is the basis of many hydraulic devices. For example, braking systems of cars; in fork-lift trucks; in tractor systems; in car jacks; in lifts, etc.Essentially a small force applied over a small area of a piston can generate a larger force elsewhere in the system utilizing a larger area.
A connected liquid in hydrostatic equilibrium rises to the same height in all open regions of the container.
The pressure is the same at all points on a horizontal line through a connected liquid in hydrostatic equilibrium.
Demonstration: The figure below shows two connected tubes .It is certainly true that the larger volume of the liquid in the wide tube weighs more than the liquid in the narrow tube. Students might think that this extra weight would push the liquid in the narrow tube higher than in the wide tube .But it doesn’t .If d1 were larger than d2, then according to the hydrostatic equation, the pressure at the bottom of the narrow tube would be higher than the pressure at the bottom of the wide tube. This pressure difference would cause the liquid to flow from the right to the left until the heights are equal.
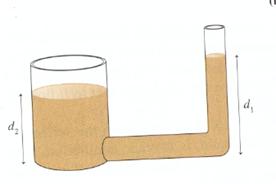
Figure: 2.6
We suggest that the teacher should give a demonstration of Pascal’s principle and then ask students to experiment in groups to feel the pressure of a liquid.
You need a small and a large syringe that are joined by a plastic or rubber tube. Remove the pistons from the syringes and fill the tube and barrel with water. Put back the large piston, and push it fully into the barrel. Then insert the small piston into its barrel. The system should now be full of water.
Press on one of the syringes while holding your thumb on the piston of the other to stop it moving. What do you notice about the forces?
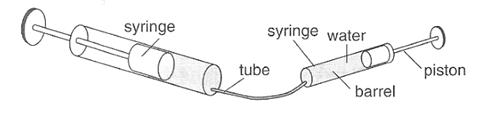
Figure: 2.7
Try it also the other way round.
Elaborate to the class that the braking system of the car is like the syringe experiment. Of course oil is used instead of water .The oil is called hydraulic fluid. A brake cylinder has a large area; a pedal cylinder has a small area. This implies that the force on the brake is much larger than the force needed to press the pedal cylinder.
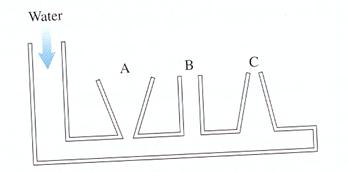
After this demonstration and thorough discussion of pressure due to liquids; let students proceed to attempt to give the correct answer to the following concept test question. Confirm their understanding and give support and assistance if there are any confusions or ambiguity.
Q. Water is slowly poured into the container until the water level has risen into the tubes A, B, and C. The water does not overflow from any of the tubes. How do the water depths in the three columns compare to each other?
Starter Activity: start the lesson asking students what will happen to objects submerged into the liquid. Let them predict.
If you take an object in your hand and let submerge the object in still water, and release the object from rest, one of three things will happen: The object will experience an upward acceleration and bob to the surface, the object will remain at rest, or the object will experience a downward acceleration and sink.
Or you may prefer to listen to their experience in lifting heavy submerged objects.
Anyone who has ever lifted a submerged object out of water is familiar with buoyancy, the apparent loss of weight experienced by objects submerged in a liquid. For example, lifting a large rock off the bottom of a riverbed is a relatively easy task as long as the rock is below the surface. When it is lifted above the surface, however, the force required to lift it is increased considerably. This is because when the rock is submerged, the water exerts an upward force on it that is exactly opposite to the direction of gravity's pull. This upward force is called the buoyant force and is a consequence of pressure increasing with depth.
Main activity: What causes buoyancy? – Figure 2.8 shows why the buoyant force acts upward. Forces due to water pressures are exerted everywhere against the object in a direction perpendicular to its surface—as shown by the vectors. Force vectors against the sides at equal depths cancel one another—so there is no horizontal buoyant force. Force vectors in the vertical direction, however, don't cancel. Pressure is greater against the bottom of the rock because the bottom is deeper. So upward forces against the bottom are greater than downward forces against the top, producing a net force upward—the buoyant force.
As shown in the figure2.8a below; a rock floats on water. The water exerts pressure forces round the rock .The total or net effect of all these forces is a force upward on the rock, the up thrust/buoyant force. The rock floats at a depth where the buoyant force balances the weight.
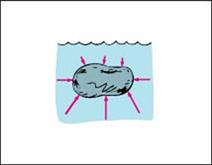
Figure 2.8a: Buoyant force on a body immersed in a liquid
Figure 2.8b
The net pressure-times-area force ( are on which a force acts) on an object submerged in a fluid is upward because of the fact that pressure increases with depth. The upward pressure times-area force on the bottom of an object is greater than the downward pressure-times-area force on the top of the object. The result is a net upward force on any object that is either partly or totally submerged in a fluid. The force is called the buoyant force on the object. The agent of the buoyant force is the fluid.
A piece of iron in water also has pressure forces round it. There is an upthrust because the pressure forces under the block are greater than those on the top. (Figure)But the upthrust is less than the weight of the iron and the iron sinks. For it to float the density of the object must be less than the density of the liquid.
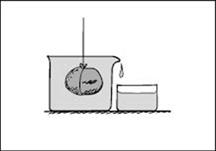
Figure: 2.9
Emphasize that the buoyant force is always upward. So why on earth would the object ever sink? The reason is, of course, that after you release the object, the buoyant force is not the only force acting on the object. The gravitational force still acts on the object when the object is submerged. Recall that the earth’s gravitational field permeates everything. The key question is whether the object (released from rest in the fluid) sinks, stays put, or bobs to the surface, is determined by how the magnitude of the buoyant force compares with that of the gravitational force. If the buoyant force is greater, the net force is upward and the object bobs toward the surface. If the buoyant force and the gravitational force are equal in magnitude, the object stays put. And if the gravitational force is greater, the object sinks.
You can also demonstrate the Cartesian diver experiment to show the equilibrium condition for a body immersed in a fluid. The test tube is placed in a long glass vessel filled with water whose opening is covered with an elastic membrane. The test tube is partly filled with water and its remaining part contains some air. When the elastic membrane is pressed the air pressure above the water in the vessel and, together with it, the pressure in the water itself increases. The air in the test tube is compressed, the volume of the water displaced by the test tube decreases and the test tube moves downwards to the bottom. When the pressure on the membrane is decreased the test tube moves backwards. The pressure on the membrane can be regulated so that the test tube is made to move in any upward or downward direction or to occupy any intermediate position between the bottom and the membrane.
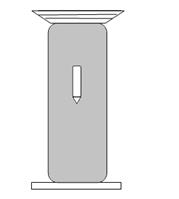
Figure 2.10: A Cartesian diver
Concluding Activity: Buoyancy is a familiar phenomenon: A body immersed in water seems to weigh less than when it is in air. When the body is less dense than the fluid, it floats. The human body usually floats in water, and a helium-filled balloon floats in air. Archimedes's principle states: When a body is completely or partially immersed in a fluid, the fluid exerts an upward force on the body equal to the weight of the fluid displaced by the body.
Keep reminding students that Archimedes’ principle can also be applied to gases and cite example as:
When a balloon floats in equilibrium in air, its weight (including the gas inside it) must be the same as the weight of the air displaced by the balloon. . A fish's flesh is denser than water, yet a fish can float while submerged because it has a gas-filled cavity within its body. This makes the fish's average density the same as water, so its net weight is the same as the weight of the water it displaces.
Example: This piece of wood weighs 43 N, and it displaces 0.0030 m3 of water. What is the buoyant force on it?
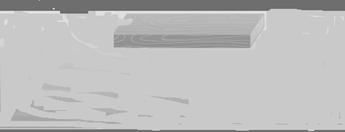
Figure 2.11: a floating block of wood
First let us find the weight of the displaced water.
Then we multiply the density of the displaced water by its volume to determine its mass, and then by g to determine its weight. This is the magnitude of the buoyant force, which is directed up. Since the buoyant force is less than the weight of this chunk of extremely dense wood, it will sink.
m = ρV
m = (1000 kg/m3)(0.0030 m3)
m = 3.0 kg
mg = (3.0 kg)(9.80 m/s2) = 29 N
F = 29 N, directed up
Concluding Activity:
After you make a summary of the lesson, have students come up with the solution of the following problems on buoyancy. If students have trouble with the problems, motivate them to take more practice on solving problems, ask their teacher for assistance and guidance, or discuss the material with a fellow student.
Starter Activity: Let us have a peek on gases, measure pressures and speculate about the mechanism of gas pressures. Ask students what makes air press on things, or how air press on things, and leave the question unanswered until further study of air pressure. Remind students that gases do press on things strongly and do move easily.
Let students perform the following simple activity: shut your mouth and puff off your cheeks and feel your cheeks with your fingers .Feel the lightly compressed air in your chest driving out through your mouth and nose when you breathe out .Or they might have heard carbon dioxide bursting out from a bottle of soda water. Gases can make a considerable pressure on anything that holds them.
Main Activity: Let the teacher demonstrate these experiments to show that the atmosphere exerts a pressure.
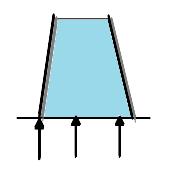
Figure 2.12:
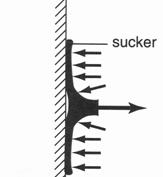
Figure 2:13: A rubber sucker
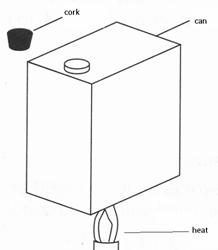
Figure 2.14: collapsing can
Note to the teacher: If students wish to try the third activity as a home experiment; they should be warned that most cylindrical cans withstand atmospheric pressure, so that a rectangular can should be used.
Concluding Activity: Provide the class with a quiz and have quick check to see if they have understood the concepts introduced in the lesson. If students have trouble with the quiz, let them reread their textbook, ask their teacher for help, or discuss the material with a fellow student. A simple and yet useful and helpful quiz may look like:
Explain in terms of pressure, how you are able to drink Mango juice by using a straw?-
Starter Activity: Begin the lesson introducing what is meant by a manometer. An open-tube manometer, a device for measuring the gauge pressure of a gas confined in a vessel. The vessel that contains the gas is connected to a U-shaped tube partially filled with mercury and open to the atmosphere at its far end. This apparatus allows physicists to accurately determine the gauge pressure of the gas.
Main Activity: Discuss thoroughly how it operates and function using fine illustrations.. This is a device called an open-tube manometer. For a given pressure in the spherical vessel, the height of the column of mercury on the right rises or falls until, with the help of atmospheric pressure, it balances the vessel pressure. The total pressure exerted on the right is the pressure exerted by the column of extra mercury, plus the pressure of the atmosphere on top of it. This total pressure balances the pressure inside the vessel
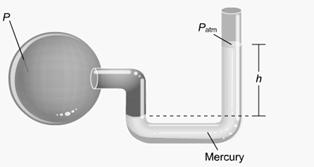
Figure 2.15: A manometer
In this illustration you see the quantities associated with a manometer. The equation states that the pressure P inside the vessel equals the atmospheric pressure Patm plus the pressure ρgh exerted by the extra mercury on the right. The pressure inside the vessel is the absolute pressure. The pressure exerted by the extra mercury on the right is the gauge pressure. If the pressure of the gas in the vessel falls below atmospheric pressure, then the mercury column on the right will be shorter than the one on the left, h will be negative, and the equation will still hold.
Group the students in the class and let them do the following activity to measure the pressure of the gas supply.
For the sake of hygiene, each student should fit his own rubber tubing to the manometer.
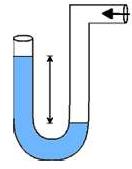
Figure 2.16: A U-tube manometer
Note that water can be used in manometers, but it is not much use for large pressures. Since water is not a very dense liquid like mercury, h becomes very big. Mercury is a good liquid to use for greater pressures.
Concluding Activity: This activity is intended to extend the students’ experience of pressure and in particular to give opportunities to measure and compare pressures. Stress the point that the pressure difference is proportional to the depth of a fluid to measure unknown pressures. Ask students about the pressure in the automobile tire. Check their understanding. If the do not give the correct answer provide them with immediate correction as-The pressure we measure in the automobile tyre is gauge pressure. When the tyre is completely flat, the gauge pressure is zero. The absolute pressure P is obtained from the gauge pressure by adding atmospheric pressure to it.
P=Pgauge + Patm
Starter Activity: Start the lesson asking this question –“Well, if the air does press on everything, could we use the U-tube and mercury to measure the atmospheric pressure?”
If students do not know what to suggest, point out that the U-tube pressure-gauges had two pressures, one on each side, the lung pressure on one side and the atmosphere on the other side-assuming for the moment that the atmosphere is with us and does press on things.
Main Activity:
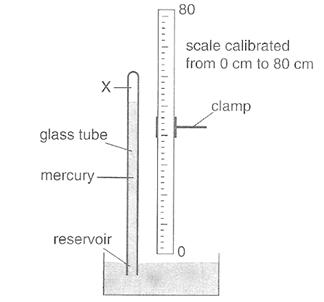
Instruments used for measuring the pressure of the atmosphere are called barometers. You can make a simple barometer using a thick glass tube longer than 76 cm closed at one end as illustrated in Figure .It has to be filled with mercury, so you must wear gloves, as mercury is poisonous. Fill the tube with mercury, holding it over the tray (you can pour mercury using the funnel) until it is nearly full at the open end. Tap it gently to get rid of air bubbles, and add more mercury it is completely full. Close that end with a finger so that there is no air in the tube and air cannot enter it.. Hold a finger on the top and invert into the trough. Do not remove the finger until the end of the tube is below the surface. The mercury level falls to the height “h”.No air has entered the tube, and so the space above the mercury in the closed tube is a good vacuum. Hold the tube in a clamp and measure the height. The height h therefore measures the atmospheric pressure. Now you have a barometer which measures atmospheric pressure in cm /mm of mercury.
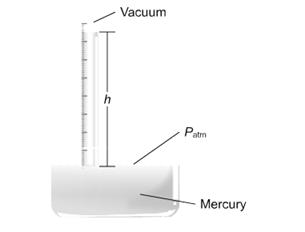
Figure2.17: A mercury barometer
The barometer is calibrated in millimeters. The height h of the column of mercury is typically about 760 mm at sea level. By definition, the pressure exerted by 760 mm of mercury, also called 760 torr, equals one standard atmosphere of pressure.
In practice, pressure is often measured in millimeters of mercury (mmHg),a unit called the torr.The various units of pressure are related as follows:
1 atm=760mmHg=760torr=1.01X10⁵ Pa
Other units commonly used on weather maps are the bar and the millibar, which are defined as
1 bar=1000millibar=105 Pa
Concluding Activity
A barometer works by having the pressure of a column of a fluid, often mercury, balance the pressure of the atmosphere at the surface of a reservoir
Provide students with appropriate questions to check their understanding as: