Unit Four: Wave Motion and Sound
Lesson One: Propagation of waves
Objectives:
- Describe what a wave is
- State the characteristics of waves
- Perform activities to demonstrate the properties of waves
Starter Activity: Introduce this chapter using water waves as a model to help conceptualize wave properties. A ripple tank would be most helpful in demonstrating the properties and behavior of water waves. One of the most difficult concepts for students to grasp involves the motion of the wave. Many students will think the water travels along the wave front. Raise questions like –have you ever watched waves in a pond/lake? Some students may recall their experience at the beach.
Energy can be sent from one place to another by means of waves. In every case, the waves travel from a source to a detector or a receiver. Waves are of many types. Sound, light and radio are common examples of waves. Sound waves can be received by the ears or by a microphone, light waves by the eyes a camera, and radio waves by an aerial attached to a radio receiver. You shall also consider waves which you can see: first waves on strings, and then waves or ripples on water.
Main Activity: A wave is a disturbance that repeats itself all points along the path that it follows. The medium of a wave is the substance through or along which the wave moves. For instance, the medium of water waves is the water; the medium of sound waves is the air. As a wave passes through a medium, the atoms that make up the medium (the particles of the medium) are displaced from their equilibrium position. This is a disturbance of the medium. Therefore, we can define wave as an organized motion of the particles of the medium, in contrast with the random molecular motion of thermal energy. We can distinguish two types of waves.
- Mechanical Waves
Mechanical waves can travel only within a material medium, such as air or water. The ones you are very familiar with are water waves and sound waves. It also includes waves on a stretched string, seismic waves (i.e. shock waves produced either artificially from explosions used by geologists in explorations or naturally occurring due to earthquakes).
- Electromagnetic Waves
These include visible light, radio waves, microwaves, infrared waves, light, ultraviolet rays, X-rays, and gamma rays which are a self-sustaining oscillations of the electromagnetic field. Electromagnetic waves require no material medium and can travel through a vacuum.
While ocean waves were always known to man, as was visible radiation, many parts of the electromagnetic spectrum were not discovered until the latter years of the 19th century and the beginning of the 20th century.
It is worth mentioning the point that a medium through or along which a wave passes must be elastic. Because a restoring force of some sort brings the medium back to equilibrium after it has been displaced or disturbed. As a wave passes through a medium, the atoms that make up the medium (or particles of the medium) are displaced from equilibrium. We call this a disturbance of the medium. Disturbance is the key word in wave motion. The water ripples are disturbances of the water surfaces as the pulse traveling down the stretched string is a disturbance. Note that the disturbance of a wave is an organized motion of particles in the medium, when compared, with the random molecular motion of thermal energy.
A wave disturbance is produced by a source. The source of the wave can be a stone thrown into water, a hand plucking a stretched string, or an oscillating loudspeaker cone pushing on the air. Once created, the disturbance travels outward through the medium at the wave speed v.
Lead the class to grasp the key point that as the disturbance propagates through the medium, a wave does transfer energy, but the medium as whole doe not move. Stress the fact that wave transfer energy, but it does not transfer any material outward from the source.
You can do the following activity to make a wave pulse:
Concluding Activity: After recapping the core points of the lesson, confirm students’ conceptual understanding posing the following conceptual questions:
- How is the motion of a wave pulse different from the motion of a moving object such as a car? (Hint: What is that moves in the case of a wave?)
- What happens to the wave pulse when it hits the far end of the string? Does the pulse stay on the same side of the string or flip to the other side? Use the word ‘reflect’ in your answer.
Lesson Two: Transverse Waves and Longitudinal Waves
Objectives:
- Identify the two distinct types of wave motion
- Distinguish between transverse and longitudinal waves
- Do activities to demonstrate these wave motions
Starter Activity: Begin the lesson reviewing the previous lesson and ask students a leading question that enable them to recall that, the particles of a string vibrate up and down but do not move in the direction of a pulse traveling along the string.
Main Activity: We can classify two distinct types of wave motion-transverse and longitudinal by the relationship between their direction of travel, and the direction of the motion of the particles in the medium.
- A transverse wave pulse is sent along the spring by moving your hand to the right or left at right angles to the spring and then back to the original position. The pulse travels along the spring and is reflected at the fixed end. To produce waves, the source has to vibrate .You can notice that the waves are close together if it vibrates swiftly; if it vibrates slowly, the waves are further apart.

Figure 4.1: Transverse pulse on the slinky
Although the wave moves to the right, the particles that make up the medium move up and down. An individual particle of the Slinky and its movement is shown with the vertically directed arrows. The direction of the wave is perpendicular to the motion of the particles of the medium. This type of wave is called a transverse wave
- Now visualize that instead of shaking the Slinky up and down, you pulls the Slinky to the left and then pushes it to the right, as shown in the figure below. This causes the spring to be stretched and then compressed. In this activity, the movement of the spring is in the direction in which the pulse is traveling. A longitudinal pulse is sent along the spring by a quick push forward followed by a pull back of the hand in line with the Slinky. Again, the pulse is seen to be reflected at the fixed end. The pulse travels with the same speed whether it is a short pulse or a long pulse.
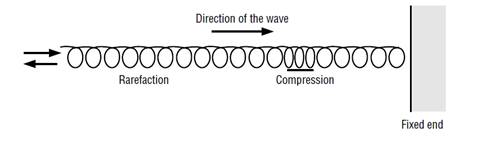
Figure 4.2: Longitudinal pulse on a slinky
- To produce a transverse wave train the hand is moved at a constant rate, left then right, at right angles to the Slinky. The longer the Slinky the better as the crests and troughs can be seen travelling continuously down the spring. When the wave is reflected at the fixed end the reflected wave interferes with the incident wave, making the progress of the wave difficult to discern.
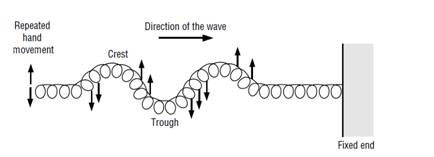
Figure 4.3: Continuous transverse waves on the Slinky
- You can produce a longitudinal wavetrain by pushing your hand back and forth at a constant rate in line with the Slinky. If you move the end of the spring to and fro, it produces a bunching of the turns of the spring called Compressions (regions of high coil density) which moves along the spring; followed by the bunching of the spring where the turns are further apart than usual called rarefactions (regions of low coil density) can be seen continuously travelling along the spring until the wave motion reaches the fixed end. This is called a longitudinal wave .Each part of the medium oscillates with the same frequency as the source (your hand, in this case).
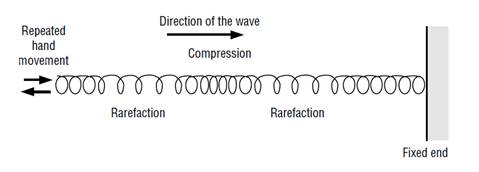
Figure 4.4:Continuous longitudinal waves on the Slinky
You will see the pulse traveling to the right. The direction in which the pulse travels is indicated by the arrow. This is how a longitudinal pulse is created in the spring. Notice that the coils vibrate back and forth in the direction in which the pulse travels. A longitudinal wave is generated by producing continuous pulses in the spring. This can be done by attaching the free end of the spring to a vibrating tuning fork.
As the end oscillates, a regular succession of compressions and rarefactions travels outwards. In this case, the wavelength of the wave is the distance from the centre of one compression to the center of the next, or from the centre of one rarefaction to the center of the next.
You can also use a line of students to demonstrate a longitudinal wave. The student should suddenly push the student in front of as soon as he or she feels the push from the student behind.
Concluding Activity: You can conclude this lesson stressing the point that in both transverse and longitudinal waves, the particles do move, but there is no net motion of the particles. A particle moves up and down, or back and forth, but it returns to its initial position. It oscillates like a mass attached to a spring.
Confirm students’ Understandings of types of wave motion, by providing concept tests that will lead to a better understanding of the concept.
- Give an example of a wave, from your own experience, you know is a transverse wave. What observation or evidence tells you this is a transverse wave?
- Give an example of a wave, from your own experience, you know is a longitudinal wave. What observation or evidence tells you this is a longitudinal wave?
- Students are lined up at a flag ceremony stand. If the student at the back pushes the student in front of him, and she in turn pushes the student in front of her, and so on, will they create a transverse or longitudinal wave in the line? Explain.
- When sports viewers do "the wave," are they making a transverse or longitudinal wave? Explain.
Lesson Three: Characteristics of waves
Objectives:
- State the terms used to describe a periodic wave.
- Describe how a wave travels through a medium
- Distinguish between a pulse and a wave train
Starter Activity: The proper understanding of waves is essential to investigate communications, whether by speech, radio or television; how we see; how we hear; how musical instruments work. How is it that waves are so important and yet so uncommon in our day-to-day experiences? Then we shall see what set of properties are characterized by the wave motion
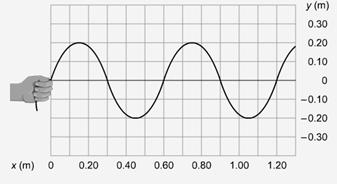
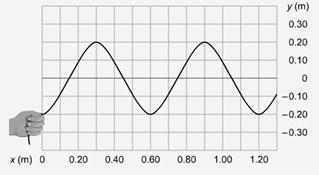
Main Activity: We say that the water and the string are disturbed as waves travel through them. The disturbances can be different sizes and can be different distances apart. In this lesson, we focus on waves in which the particles are vibrating in simple harmonic motion. This vibration will be caused by something (in this case, a hand) moving or vibrating in simple harmonic motion. The result is the type of sinusoidal wave you see to the right.
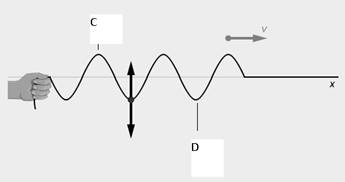
Figure 4.5: A sinusoidal wave
Here, the hand jerks the string up and then down, creating a disturbance that travels along the string. This single disturbance is called a wave pulse. When the handshakes the string in a repeating up and down motion, it creates a continuous wave that travels along the string. If the hand moves up and down in simple harmonic motion, the result is the sinusoidal wave you see here.
These waves are periodic because they are generated by a source (a hand in this case) whose motion is periodic. Thus a periodic wave is a continuous and regular disturbance which travels in a medium due to the periodic oscillatory motion of the particles of the medium.
The vertical arrows indicate the displacement of the particles of the string as the wave travels on it. Notice at points marked C the displacement has a maximum positive value. These points are called crests. On the other hand, at points marked D, the displacement has a maximum negative value. These points are called troughs.
Thus, the crest of a transverse wave traveling in a medium is the point where the displacement has a maximum positive value and the trough is a point where the displacement has a maximum negative value.
The maximum displacement of a particle occurs at crests and troughs. The distance between the equilibrium or rest position of the particle and its maximum displacement is the amplitude of the wave. Another way to define amplitude is the height of a peak. The amplitude of a wave is always a positive value, so you can consider it the absolute value of the greatest displacement.
Figure 4.6:
The wavelength is the distance between two nearest identical /equivalent points in any wave. Usually, it is easiest to measure this distance between two adjacent crests or troughs.
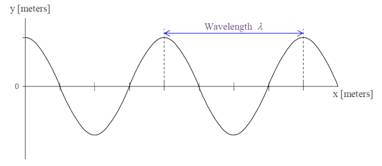
Figure 4.7:
Wavelength is the distance between two successive crests or troughs (in the case of a transverse wave) or between two successive compressions or rarefactions (in the case of a longitudinal wave).It is usually represented by and is measured in meters in the SI system.
It is clear that a crest is produced every time your hand moves up. Thus the time interval between two successive crests (or troughs) is equal to the time period of your hand. Hence wavelength may also be defined as the distance travelled by the wave in one time period of particle vibrations. Notice that the shape and size of a wave is described by its wavelength and amplitude.
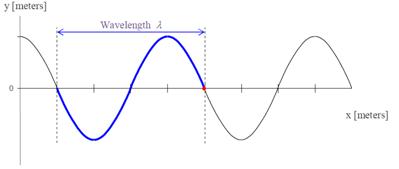
Figure 4.8
We can also say that the wavelength is the distance in which the disturbance at one instant of time repeats itself.
The period of a wave T is the time taken by any particle of the medium to complete on full oscillation or vibration. It is expressed in seconds. The period of a wave is the same as that of the vibrating source that produces the wave.
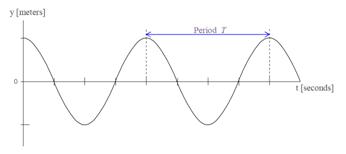
Figure 4.9:
The frequency of a wave is the number of oscillations done by any particle of the medium in one second .It is usually denoted by the letter  and is expressed in hertz(Hz).The frequency of a wave is obviously equal to that of the vibrating source that produces the wave.
Concluding Activity: You can conclude this lesson by summing up the terms used to describe a periodic wave, which distinguish one wave from another. These are: Amplitude, period, wavelength, and frequency.
Check students’ Understandings of characteristics of waves, by providing questions that will lead to a better understanding of the concept.
- Determine the amplitude of the wave by looking at the graph below.
- Measure the distance between two adjacent peaks.
- In a transverse wave, a crest and the next trough are 5cm apart. What is the wavelength of the wave?
- A wave is traveling through a particular medium. The wave source is then modified so that it now emits waves at a higher frequency. Then the wavelength, ,
- Increases
- decreases
- stay the same
Lesson Four: Wave speed
Objectives:
- Describe how the speed of wave is determined
- Explain the speed of wave in different medium
Starter Activity: Initiate this lesson reminding students that the disturbance of a wave moves away from the source. This implies waves have speed. Ask students to name different types of waves which have different speeds. Let them compare the speed 300,000,000 m/s for light of light and 343 m/s for sound in air. Which one moves faster?
In this lesson we will have a look on the wave speed with which the disturbance travels in a medium. In the case of a transverse wave, it is the speed with which the crests or troughs travel. In the case of a longitudinal wave, the speed with which the compressions or rarefactions travel is the wave speed
Main Activity: How fast a wave moves through a medium is known as its wave speed. The wave speed, the constant speed with which the wave propagates, can be expressed in terms of wavelength and frequency we have just discussed
Let us derive the relationship between wave speed, wavelength and frequency. If a wave travels a distance s in a time t, its speed v is given by:
Wave speed=distance traveled/ time taken Or
v = S / t .png)
By definition, the distance travelled by a wave in a time period T is its wave length , that is if t=T and s=
Then v=/T
But 1/T= V
Where  is the frequency?
Hence: v = V 
i.e. Wave speed=frequency wavelength
Notice that this relation, called wave equation, holds true for both transverse and longitudinal waves.
The relation v= V can be easily understood using the analogy of the speed with which you walk, the number of steps you take in 1s and the length of each step.
Let V=10 the number of steps you take in 1s, that is, V=5 Hz is the frequency of your steps. Let =100cm length of each step. Then you walk with a speed v = V = 10X100 = 1000cm/s. Similarly if wave source emits 10 waves per second, that is, its frequency V=10Hz and each wavelength is 100cm long, the wave must be traveling with a speed of v = V = 10X100 = 1000cm/s.
Note: The wave velocity is the speed and direction with which the wave pattern is traveling. It is not the speed with which the particles making up the string are traveling in their up and down motion. The direction part is clear-cut the wave propagates along the length of the string, away from the source (something oscillating) of the wave.
Worked Example:
Suppose the wavelength of visible light is 6x10⁻⁷ m. And the light completes 5 cycles in 10-14 second. Calculate the light’s wave speed in m/s.
First compute the frequency of the light:
V=5 cycles/10-14 second = 5X10¹⁴ cycles /second = 5X10¹⁴ Hz
Then apply the wave equation: v=V
V= (6X10⁻⁷) (5X10¹⁴ Hz) =
V=3X10⁸ m/s
Note: Light from a point source can also be represented as waves. Of course you cannot see the crests and troughs of these waves with your eyes because the wavelength is so short (and the speed of light is so large).Since the waves move outward from the point source in all directions (in three dimensions), they are spherical waves rather than circular ones (like the water waves in two dimensions).
Concluding Activity: After showing the derivation of the wave equation, let students apply the equation in solving both qualitative and quantitative problems. Confirm students’ understandings of applying wave equation, by providing concept tests that will lead to a better understanding of the concept.
- A wave has a wave speed of 240m/s and a wavelength of 3m.Calculate:
- The frequency
- The period of the wave
- A girl produces surface water waves on a calm lake by rocking a boat. It is found that the boat performs 12 oscillations in 20 seconds and also that a given waves crest reaches the shore 20m away in 4 seconds, Find:
- The frequency
- The speed, and
- The wavelength of the waves.
- A water strider (an insect walking on water) rests on a surface of a quite lake. A stone thrown into the lake creates a series of sinusoidal ripples that pass through the location where the strider sits, so that it rises and falls. The distance between its highest and lowest locations is 0.008 m. What is the amplitude of the wave?
- 0.003m
- 0.004m
- 0.002m
- 0.008m
Lesson Five: Properties of waves - Reflection
Objectives:
- Explain the common properties of waves.
- Define the term reflection
- State the laws of reflection
Starter Activity: Start the lesson citing common experience in daily life such as: When you look at yourself in a mirror, you are seeing a reflection of yourself. When you look at the Moon at night, you are seeing sunlight reflecting off that distant body. Ask students if they have experienced the broken appearance of a spoon placed in a glass of water, the sparkling effect of we see on the street ahead of us on a very hot day; the deceptive shallowness of a body of water.
We will use the concepts of waves to explain all these effects.
Main Activity: In this lesson we discuss some common properties of waves. These are:
- Reflection
- Refraction
- Diffraction
- Interference
Now let us consider how a traveling wave is affected when it encounters a change in the medium. For example, imagine a pulse traveling on a string that is rigidly attached to a support at one end. When the pulse reaches the support, a severe change in the medium occurs, that is the string ends. The result of this change is that the pulse undergoes reflection-that is the pulse moves back along the string in the opposite direction. Notice that the reflected pulse is inverted.

Figure 4.10: wave pulse approaching a fixed end
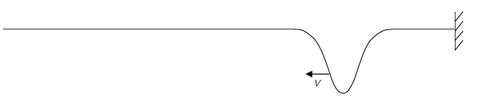
Figure 4.11: wave after reflection
Now visualize another case this time, the pulse arrives at the end of the string that is tied to a ring of little mass free to slide vertically on a smooth post without friction. In this case, the pulse is reflected, but it is not inverted. When it reaches the post, the pulse exerts a force on the free end of the string, causing the ring to accelerate upward. This movement of the ring creates a reflected pulse that is not inverted and that has the same amplitude as the incoming pulse.

Figure 4.12:
Similarly when a surface wave in a ripple tank or lake encounters a barrier it is unrestrained (the medium is not attached to a barrier) and the reflected wave is consequently not inverted. When a surface wave in a lake (ripple tank) strikes a straight barrier, the wave is unrestrained the wave crest is reflected as a crest, and a trough is reflected as a trough.
You can demonstrate this by generating a single straight wave in the tank by gently pushing a ruler or other straight edge and observe the reflection of the wave from the opposite wall. The incident wave is unrestrained (the medium is not attached to a barrier) so the reflected wave is not inverted and a crest is reflected as a crest and a trough is reflected as a trough .If an incident wave is restrained, as was the case when you sent waves down the string tied securely to a wall, the incident wave is inverted and a crest is reflected as a trough while a trough is reflected as a crest. The reason can be explained as follows: when you send a transverse wave down a string that is tightly attached at one end the reflected wave is inverted. A wave traveling in a string will invert when it reaches a fixed end because the upward force exerted by the wave is accompanied by an opposite and equal reaction force, that causes the wave to invert. This downward force causes the pulse to invert upon reflection.
The reflection of water waves can be easily brought about by placing a barrier in the path of the incoming wave. You can see the reflection of a plane wave at a straight barrier. In the case of the plane wave, it is always found that the angle between the incident wave and the barrier is equal to the angle between the reflected wave and the barrier. But instead of drawing in the line of the wave fronts, it is more usual to draw in the direction in which the wave is traveling. Do not confuse the wave front with the direction in which it moves. The wave moves at right angles to the wave front. And instead of measuring the angles between the wave front and the reflecting surface, we measure angles between the direction of the wave travel and a perpendicular to the reflecting surface, called normal to the surface. The law of reflection states that the angle of incidence is equal to the angle of reflection.
Teaching note for the teacher: You may wish to relate the significance of reflection of waves with modern telecommunication systems using dish aerials to send messages over very long distances. It is worth noting that dish aerials are parabolic in shape and use reflection of waves while ordinary aerials send signals in all directions; so the signal gets weaker the further it travels. A dish aerial does not send energy in all directions. The signal starts out in the opposite direction to its final direction, and is reflected off the dish into a parallel beam. The receiver must face the dish and the dish must point towards the satellite or other source.

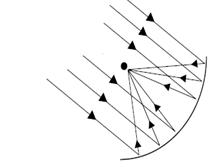
Figure 4.13: Dish areal transmitting and receiving a beam of energy
An antenna or aerial is used to radiate the energy from a transmitter into the space. The antennas used at the transmitting stations are called transmitters while the antenna used for receiving the radiated energy, near the receiver is called the receiver. An antenna is a conversion device which converts an electrical signal to electromagnetic energy when used as a transmitter and vice versa when used as a receiver.
Concluding Activity: You can provide the class with a quiz and have quick check to see if they have understood the concepts introduced in the lesson. If students have trouble with the quiz, let them reread their textbook, ask their teacher for help , assistance or guidance in tackling both qualitative and quantitative problems, or discuss the material with a fellow student. A simple and yet useful and helpful quiz may look like:
- When you send a transverse down a string that is firmly attached at one end the reflected pulse is inverted. Explain
Lesson Six: Properties of waves – Refraction
Objectives:
- Define what is meant by the term refraction.
- State the laws of refraction
Starter Activity: Commence the lesson mentioning common experiences in students’ encounter in their daily life. You may ask them if they have noticed when they stand at the edge of a pool and try to poke something underwater with a stick; they may misjudge the object’s location. This is because the light from the object changes direction as it passes from the water to the air. You perceive the object to be closer to the surface than it actually is because you subconsciously assume that light travels in a straight line.
Main Activity: Refraction is the change in the direction of a wave at the interface between two materials. The interface is the boundary between two media, and the wave bends there. It is the surface between two media, such as air and water. Refraction is caused by a change in the speed of a wave as it crosses the interface.
In order to explain this refraction we can carry out an experiment in which plane waves are incident normally on a deeper /shallower water boundary. It is possible to change the speed of a wave in a ripple tank by changing the depth of the water. To obtain a significant change, the wave must move from a deep region to the shallower region. Put a glass plate in a ripple tank so that a very shallow layer of water lies on top of it. In the rest of the ripple tank the water will be much deeper. Use a single pulse or a plane wave generator to send waves along the tank and see if their speed changes when they reach the shallow water. Note the effects on the waves which pass over the plate. You can easily see the plane wave has slowed up as it passes over the shallow region.
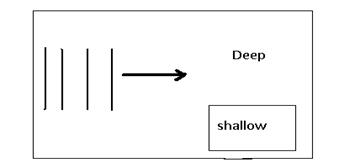
Figure 4.14: Refraction of water waves
When the waves meet the plate at an angel, you can observe a change of direction. The waves’ direction of travel is bent towards the normal because of the change in speed. The end of the wavefront which meet the boundary first travels more slowly and not as far as the part of the wave front which has not yet reached the boundary.
Concluding Activity: You can conclude this lesson reinforcing the key point that refraction occurs when a wave travels obliquely (at an angel) from one medium to another. When the wave encounters a boundary at an angle, the part of the wave front striking the boundary changes speed before the other part of the wave front, causing the wave to bend toward or away from the normal and change direction.
Then confirm students understanding of the lesson with the help of the following questions.
- What generally happens to the speed of water waves on the lake as they approach the shore?
- When a wave moved from the deep water to the shallow water above the immersed plate of glass, did the frequency increase, or decrease? What happens to the wavelength and speed?
Make sure the reply given by the students and their line of reasoning should be in agreement with the following:
- The water waves on the surface of the lake slow as they approach shallow waters near the shore.
- Students will note that waves slow and wavelengths shortens as they move into the shallow water; however, the frequency does not change is dependent only upon the frequency of the source, not the media through which the wave travels.
Lesson Seven: Properties of waves – Diffraction
Objectives:
- Define the term diffraction
- Identify how waves diffract through narrow openings or slits.
- Observe and explain the behavior of water waves when it interacts with material obstacles (diffraction)
Starter Activity: You can begin this lesson stating the point that the effects we are going to consider now are not quite common as those we have studied so far. Pose questions like- why you can hear sound through a doorway even when you are not standing directly in front of it.? Does light always travel in straight lines or can it bend around corners under certain conditions?
Main Activity: Simple objects like the hole in a button, or a wire can be used to observe diffraction. You can see water waves, after passing through an opening, spreads out to fill the space behind the opening. The ripple tank is a very convincing and easy way of displaying the spreading out of waves on passing through openings or around obstacles. This inevitable spreading of waves is the phenomena known as diffraction.
- Set up the ripple tank with a vibrating source to send out straight waves.
- Place a long barrier parallel to the ripple with its vertical edge in the middle of the tank. Notice the diffraction or bending of the waves at different wave frequencies (varying motor speed)
- Position the second barrier about 3 cm from the first one to form a slit. Investigate the effect on the resulting diffraction pattern of varying slit width for a fixed wavelength and of varying wavelength for a fixed slit width.
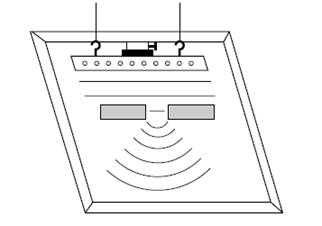
Figure 4.15: A spreading of waves occurs into the region behind the barriers (slit)
In the figure above, you can see, where plane waves approaching from left, spread out in circular arcs after passing through a hole in a barrier.
Demonstration: You can see effects which arise from the diffraction of light from a simple experiment which students can perform right at their seats. Let students held up their left hand at arm’s length, with the first two fingers close together, so that there is a narrow slit through which light can pass through them. Look through this slit at a bright source of light, such as a white cloud or a bright electric bulb. Then bring up your right hand just in front of your eye, again with two fingers close together. Ask students this question: can you see a series of vertical bands of light? Notice that the width of pattern is wider than the width of the second slit, and the light must be spreading out after passing through this slit. If the fingers close to your eye are opened out, the patterns disappear and the slit alone is seen. If the fingers are closed more, the pattern gets fainter and at the same time broadens out.
The spreading of waves is most noticeable in the case of sound waves as well. Note that the wavelength of sound waves can be in the range of a few centimeters to a few meters.But, the spreading is greater and that is why we are able to hear round corners even though we may not be in a direct line of the source.
Concluding Activity: After you recapitulate the basic underlying points of the lesson, let students practice in groups the activities which sows the diffraction waves.
Lesson Eight: Properties of waves – Interference
Objectives:
- Define the term interference
- Distinguish between constructive and destructive interference.
Starter Activity: Start the lesson relating common experience observed to clarify the concept behind and make learning easy. Ask students if they have seen beautiful colors on the surface of the ground in wet streets where some petrol or oil has spilled? Highlight both of these effects can be explained by applying the concepts and behaviors of waves.
Main Activity:
It is evident that two balls cannot occupy the same point of space at the same time. Whereas a material object like a ball will not share its space with another ball, more than one vibration or wave can exist at the same time in the same space. If we drop two balls in water, the waves produced by each can overlap and form an interference pattern. Therefore, unlike particles, waves can pass directly through each other.
When two or more waves are simultaneously present at the same space at the same time, the displacements add at every point. This is the superposition principle. So when the crest of one wave overlaps the crest of another, their individual effects add together to produce a wave of increased amplitude. This is called constructive interference. When the crest of one wave overlaps the trough of another, their individual effects are reduced. The high part of one wave simply fills in the low part of another. This is called destructive interference.
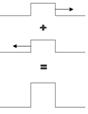
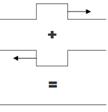
Figure 4.16: Interference of waves
To clarify the principle of superposition you can cite some common experiences such as-When waves on a lake hit the shore, a smaller reflected wave travels back to sea. When reflected waves meet incoming waves a short swell occurs in which the crest of the combined waves equals the sum of the heights of the two individual waves, causing the swimmer nearby to rise higher for a short period of time. It is clear from such observation that waves travel through the media independent of each other. This independence helps us to hear the sound of individual trumpet from the midst of the music band.
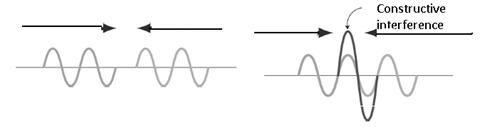

Figure 4.17: Constructive and destructive interference
Demonstration: You can demonstrate interference by putting two fingers close together, leaving a very small gap. Bring the fingers very close to one eye, closing the other eye, and an interference pattern of vertical lines can be seen in the gap between the fingers. The same effect can be achieved if two slits are cut in a piece of paper. Cut the paper with a sharp edge such as a scissor or a razor blade. The slits should be very close together and about the length of the index finger.
Concluding Activity:
Without a water wave apparatus that allows relatively high, uniform frequencies for the two point sources, it is not possible to observe interference between the waves. This activity still illustrates two things: 1) the analogy of two point sources for water waves, and how the waves from these two sources spread out as circles and 2) the fact that the two waves are not affected by each other except possibly at the points where they cross each other.
Fill the two eye droppers with water, and hold them about 3 cm apart and about 5 cm above the surface of the water in the trough. Squeeze the droppers so that drops fall from both at the same time at a fairly fast rate. Use observation sheet to sketch the wave pattern that you observed.
- Describe the wave pattern you observed. Is there any evidence that the waves from one of the point sources are changed by the waves from the other point source when they cross each other’s paths? Explain.
- Why are you able to hear the sound of a guitar amidst the collection of sounds generated by the band?
- Place the water trough on the overhead projector, and fill it with about 2-3 cm of water. Use an eyedropper or syringe held about 5 cm above the surface of the water to drip drops in the center of the trough at a steady rate, and watch the pattern on the wall or screen. Observe what happens with fewer drops per second and more drops per second.
- Describe the water wave pattern you observed, and compare it to your prediction. What is the shape of the observation with more drops/sec observation with fewer drops/sec water waves from a point source?
- What happens to the spacing between the water wave crests (and troughs) when the number of drops per second is increased? Decreased?
Note: The number of drops per second is called the frequency, and the spacing between the crests is called the wavelength.
Teaching note:
It takes a little practice to be able to produce drops at a constant rate, and to vary the rate. However, it is possible to get nice patterns of circles spreading out from the point where the drops hit the water. These patterns are clearly visible on a screen or wall using an overhead projector. Student observations should be in line with figure below.
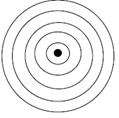
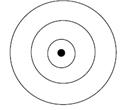
Figure 4.18: Patterns of circles spreading out from a point
The waves are shaped like concentric circles with the point where the drops hit the water as the center. When the number of drops per second is increased, the spacing between the waves crests decreases. When the number per second is decreased, the spacing between the crests increases.
Lesson Nine: Seismic waves
Objectives:
- Explain how scientists use seismic waves to locate the epicenters of earthquakes.
- Distinguish between P-waves and S-waves
Starter Activity: You can relate this lesson with prior concepts learnt about waves. Associate the parameters of wave to the surface waves on the earth. The magnitude of an earthquake is the energy released at the focus of the earthquake. It is measured with the help of an instrument called seismograph. The instrument's reading (amplitude of seismic waves) indicates the amount of strain energy released by an earthquake. The greater the wave amplitude, the greater the magnitude.
Main Activity: Earthquakes generate seismic waves that travel through the earth. The P-wave (primary wave) is a longitudinal or compression wave in which the particles vibrate parallel with the line of the wave’s propagation. The S-wave (secondary wave) is a transverse wave in which the displacement is at right angle to the direction of wave propagation. Since P-waves travel fastest, they arrive first at the seismograph, followed by S-waves. P-waves and S-waves, carry energy away from the focus of an earthquake .A seismograph is an instrument used to measure the strength of an earthquake. It is a sensitive instrument that measures and records seismic waves. When a seismic wave shakes the seismograph, the pen marks zigzag lines on a revolving paper roll. The lines are similar to this:
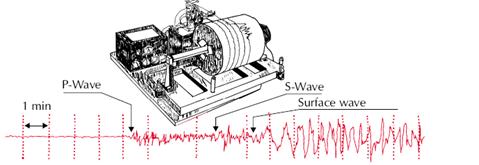
Figure4.19: seismograph and seismogram
By carefully timing the arrival of the P and S waves, seismologists are able to determine the epicenter of an earthquake and the size and orientation of the active fault. Scientists can calculate the distance to the epicenter of an earthquake by reading the seismogram and calculating the time difference between the arrival of the P-waves and the S-waves at the seismograph.
It takes readings from three seismograph stations to locate the epicenter of an earthquake as seen in the diagram
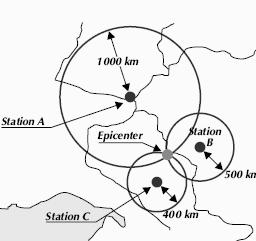
Figure4.20: Epicenter determination
Assume a scientist finds that the distance from Station A to the epicenter of an earthquake is 1,000 kilometers. The epicenter, therefore, might be at any point on a circle with a radius of 1,000 kilometers around station A on a map. The scientist draws this circle around Station A on a map. Assume that scientists at Station B and Station C have also read the charts and determined the distances to the epicenter to be 500 kilometers from Station B, and 400 kilometers from Station C. Scientists draw circles around their stations at B and C on maps, using the distance to the epicenter for the radius of each circle as before. The epicenter of the earthquake, shown on the previous diagram, is the point where the three circles intersect on a map.
Lesson Ten: Sound waves - Transmission of sound
Objectives:
- Describe how sound waves are produced and propagated
- State the properties of sound waves
- Identify the factors that affect the speed of sound in air
Starter Activity: You may initiate this lesson by highlighting the significance of sound waves. There are several types of waves in nature, but two are particularly significant to us .These are sound waves and light waves which are the basis of hearing and seeing. These two waves are essential to our perception of the environment. The source of all sounds consists of vibrations of an object sending out waves through the medium in which it is placed. In this chapter we discuss the properties of sound waves, their propagation, transmission and their production by vibrating systems.
Main Activity: Sound waves travel through gases and they travel through liquids and solids as well. Every source of sound has a vibrating body. When drummer strikes the drum, you hear the sound of the drum and feel the vibrating membrane. The sound stops when the membrane stops vibrating. When you pluck the string of a kirar, or masinko you will not only hear the sound of the vibrating string but will also be able to see the vibrations of the string. Similarly, when you blow a whistle, it is the vibrations of the air in the whistle that produces the sound you hear. Your voice is also formed by the vibration of your vocal cords.
When the prongs of a tuning fork move forwards, the air in front of it is compressed; when it moves backwards the air in front of it is rarefied. If the prong oscillates continuously, successive regions of compressed and rarefied air are formed. The compressions and rarefactions move outwards from the source but the air itself does not move outwards. Compare this behavior with the water waves produced in a ripple tank or longitudinal waves produced in a spring.
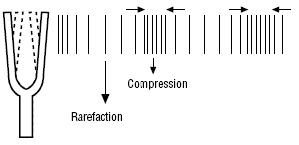
Figure 4.21: sound waves
In all the above case sounds were produced when solids such as metals, membranes, strings and air vibrated to and fro. The energy was then transmitted by longitudinal waves. Can you think of an example of sounds being produced by a moving liquid? In general sounds are not produced by vibrating liquids, although sound waves can travel through liquids very easily.
Most sounds that we hear are transmitted through the air. However, any elastic material whether solid, liquid or gas can transmit sound.
Air is a poor conductor of sound when compared to solids and liquids. Carry out the following activities and compare the loudness of the sound heard. You can hear the sound of a distant train more clearly if your ear is placed against the rail. Similarly, a watch placed on a table beyond hearing distance can be heard if you place your ear to the table. Or click some rocks together under water while your ear is submerged. You'll hear the clicking sound very clearly. If you've ever been diving under water in the presence of motorized boats, you probably noticed that you can hear the boats' motors much more clearly under water than above water. Liquids and solids are generally excellent conductors of sound much better than air. The speed of sound is generally greater in liquids than in gases and still greater in solids. Therefore, solids, liquids and gases transmit sound, but sound cannot travel in a vacuum, for the transmission of sound requires a medium. There can be no sound, if there is nothing to compress and expand.
Sound is a form of energy, but weak when compared to other forms with which we are familiar. While engineers and scientists are busy at work learning how to tap the energy of wind, sunlight, tides, and alternative fuels, no research is being done on harnessing the energy in sound because it is insignificant or weak.
Concluding Activity: You may wish to sum up this lesson by reinforcing the core point that any source of all sound has some part which is vibrating. Sound being mechanical waves needs a medium, solid, liquid or gas for its transmission.
Check whether students gain a clear knowledge and understanding of the production, transmission and propagation of sound waves, using the following discussion questions:
- Give evidence to support the statement that sound is a form of energy.
- Describe in short an experiment to verify that sound cannot travel through a vacuum
- Describe an experiment which shows that sound cannot travel in a vacuum.
Lesson Eleven: Hearing
Objectives:
- Identify a normal audible frequency range.
- Distinguish between infrasonic and ultrasonic frequencies.
Starter Activities: You may wish to start this lesson stating the point that the human ear is sensitive to a wide range of frequencies, and then ask students to name some animals which can perceive frequencies that humans cannot. Discuss students’ experience that when it comes to certain sounds, the ear is not the most sensitive part of the human body.
Main Activities: The sensation of hearing arises as the result of the action of mechanical vibrations of the human organs of hearing. A human ear can perceive vibrations of definite intensity; with frequency limits from 20Hz to 20,000Hz.This is the audible frequency range.
For a sound to be heard, the sound waves must reach the hearer’s eardrum. When this happens, the eardrum is made to vibrate with the same frequency as the waves themselves.
Our ears are able to detect sinusoidal sound waves with frequencies in the audible range. Low frequencies are perceived as a ‘low pitch’ note while high frequencies are heard as a ‘high pitch’ note. Our high-frequency range of hearing deteriorate either with age or, as a result of exposure to loud sounds that damage the ear.
Sound waves exist at frequencies well above 20,000Hz, though humans cannot hear them. These are called ultrasonicfrequencies, because they are above the normal hearing limit. And sound waves below 20Hz are called infrasonic frequencies, for they are below the normal hearing limit. Oscillators vibrating at frequencies of many MHz are able to generate ultrasonic waves used in ultrasound medical imaging. Notice that a frequency of 350 KHz corresponds to ultrasonic waves of wavelength 0.001m; and a frequency of 3MHz traveling through water, which is basically our body, at a speed of 1480m/s has a wavelength of 0.5mm.It is this very small wavelength that allows ultrasound to image very small objects.
Concluding Activity: After you make a short, concise concluding remarks emphasizing on the core points of the lesson. Form groups in a class and allow students to discuss and come up with short explanation on the following questions.
- Can we hear sounds of all frequencies? What are ultrasonic?
- Why is a man’s voice different from a woman’s voice?
- Calculate the wavelength of ultrasound in water if its speed is 1400m/s and its frequency is 500 kHz.
Lesson Twelve: Reflection of sound
Objectives:
- Define what is meant by the term echo
- Determine the depth of a liquid using echo depth sounding method.
Starter Activity: Start the lesson by posing questions as :how do water waves reflect? After you hear their response you can proceed the lesson stating that like water waves, sound waves will be reflected when they meet an interface between media of different densities.
Main Activity: When sound waves meet the boundary between one medium and another, just like water waves, some energy is transmitted into the other medium, and some is reflected. The reflection of sound wave is referred to as an echo.
The proportion of energy carried by the reflected sound wave is large if the surface is hard and smooth like stones and less if the surface is soft and irregular. Sound energy not carried by the reflected sound wave is carried by the transmitted or absorbed wave.
Sound reflects from a smooth surface the same way that light does—the angle of incidence is equal to the angle of reflection. Sometimes when sound reflects from the walls, ceiling, and floor of a hall room, the reflecting surfaces are too reflective and the sound becomes distorted. This is due to multiple reflections called reverberations. On the other hand, if the reflective surfaces are too absorbent, the sound level would be low and the hall would sound dull and lifeless. This is mainly done in concert halls and studios or musical recording systems.
A simple activity to demonstrate the law of reflection of sound waves can be illustrated as: A ticking sound from a watch is sent out through the tube in a certain direction. The second tube, which is connected to the ear, is moved until the reflected sound of ticking is at maximum. Keep one ear close to the upper end of the other tube, and holds the tube at different angles until the ticking of the watch sounds louder. At that point, a large protractor is used to measure the angle between each of the tubes and a ruler held perpendicular to the wooden board where the tubes meet. When this is so, it is found that the angle of incidence and the reflection of sound at the reflecting board are nearly equal.
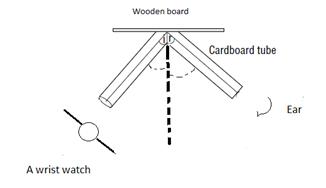
Figure 4.22: Law of reflection
An ultrasound source placed on a ship sends ultrasound pulse into the water which is propagated in a definite direction. When this pulse is arriving at the sea floor it is reflected and in some time the reflected wave reaches a receiver on a ship. The measurements of the time interval between the instances when the pulse is sent and received make it possible to determine the depth of the sea floor.
Concluding Activity: After you make a summary of the key ideas in the lesson, confirm whether students meet the expected objectives using practical activity as:
Measure the speed of sound using echoes. Let students in groups do this experiment outside of school time.
- Find a big building with a large flat wall in a calm place.
- Stand a long way away from the wall and clap hands or strike bang of two board's together. Listen for the echoes reflected from the wall.
- Adjust the rate of clapping in such a way that a clap coincides with the return of the echo from the wall.
- Measure the time taken from the first clap to hearing the echo of clap 11 at this particular rate > this is 10 clap intervals.
- Repeat this observation and find a mean or average time for the two measurements.
- Measure the distance from the position of the clapper to the wall.
Lesson Thirteen: Speed of sound
Objectives:
- Determine the speed of sound in air.
- Describe the factors that affect the speed of sound.
Starter Activity: You may start this lesson highlighting the fact that the speed of sound waves depends on the properties of the medium. A thermodynamic analysis of compressions and rarefactions shows that the wave speed in a gas depends on the temperature and on the molecular mass of the gas. For air at room temperature (20 0C) the speed of sound is 343m/s.
Main Activity: A distance as small as 100m is enough to notice a slight delay between when you see something such as hammering a nail, and when you hear it. If we watch a person at a distance chopping wood, we can easily see that the sound takes place an appreciable time before its sound reaches our ears. Thunder is heard after a flash of lightning is seen. These common experiences show that sound requires a recognizable time to travel from one place to another. The speed of sound depends on wind conditions, temperature, and humidity. It does not depend on the loudness or the frequency of the sound; all sounds travel at the same speed. The speed of sound in dry air at 0°C is about 330 meters per second.. Water vapor in the air increases this speed slightly. Sound travels faster through warm air than cold air. This is to be expected because the faster-moving molecules in warm air bump into each other more often and therefore can transmit a pulse in less time. For each degree rise in temperature above 0°C, the speed of sound in air increases by 0.6 meter per second. So in air at a normal room temperature of about 20°C, sound travels at about 340 meters per second.
As with other mechanical waves, the speed of a sound wave depends on the properties of the medium through which the wave travels. As you can see from the table, sound tends to travel faster in liquids than in gases, and faster in solids than in liquids.
| |
Substances (at 20 0C ) |
Speed (m/s) |
| Gases |
Air |
343 |
| Liquids |
Fresh water |
1483 |
| Solids |
Glass |
5640 |
Liquids and solids are less compressible than air, and that makes the speed of sound in liquids and solids higher than air.
The speed of sound in air depends on the air temperature. The equation shows that the speed of sound increases with air temperature.
V= V0+ (0.6m/s/ 0C) T 0C
Where V0 = 331m/s is the speed of sound in air at 0 0C.The speed of sound is a little bit lower at lower temperatures and a little higher at higher temperatures.
The simplest method that we use to measure the speed of a sound wave is to use a clock to measure the time between the light arriving and the sound being heard.
Another method is to use echo sounding. An echo is heard when the sound is reflected. You hear the echo after the initial sound because the wave has to travel out and back again.
Speed=distance/time= 2S/t
Where s is the total distance traveled by the sound wave and t is the time taken.
The reflection of sound can be used for measuring the depth of a lake at a certain place. The device used for this purpose is called sonar which is carried in the ship. The device emits ultrasonic sound (high frequency) towards the bottom of the lake. The sound reflected from the bottom of the lake is received by the device .By measuring the time taken by the sound to return to the ship and knowing the speed of sound in water, we can find the depth of the lake at that particular place.
The speed of sound can also be used to determine distance from a thunderstorm. Seeing lightning before hearing the thunder is due to the relatively low speed of sound compared to that of light. By measuring the number of seconds between the flash of lightning being seen and the thunder being heard, the distance away of the storm may be estimated and by repeating the procedure it can be determined whether or not the storm is approaching or retreating.
Example: On a hot summer day of temperature 30 0C ,a hiker shouts into a cliff. He hears the echo 2 seconds later. How far away is the opposite side of the cliff?
Known variables:
Temperature T 0C=300C
Time t=2s
Speed of sound=V
Distance to the other side of the cliff=S
The steps or strategy we need to follow to solve this problem is:
- Determine the speed of sound in air at 30.0°C.
- Use the speed of sound and the time for the sound to travel out and back to determine the distance to the other side of the cliff
The physics principles and equations we use to tackle this problem includes:
The equation for the speed of sound in air is,
V= V0+ (0.6m/s/ 0C) T 0C
V=331m/s+ (0.6m/s/ 0C ) (30 0C )
V=331m/s+18 m/s
V=349m/s
Now that we have determined the speed of sound, we can determine the distance to the other side of the cliff
V= S/t Definition of speed
V= 2S/t Total distance
S=Vt/2 Solve for S
S= (349m/s) (2s) /2 Substituting values
S= 349m
Concluding Activity: You can provide the class with a quiz and have quick check to see if they have understood the concepts introduced in the lesson. If students have trouble with the quiz, let them reread their textbook, ask their teacher for study aids that will clarify concepts, or discuss the material with a fellow student. A simple and yet useful and helpful quiz may look like:
- Calculate the speed of sound if a wave of wavelength 0.6m that has a frequency of 700Hz.
- Why do the vibrations of a tuning fork rapidly die away?
- An ultrasonic sound is sent from a ship towards the bottom of the lake .It is found that the time elapsed between the sending and receiving of sound is 3 seconds. If the speed of sound in water is 1483 m/s.Find the depth of the lake.
- The time between a flash of lightning and crack of thunder is 4 seconds. How far away is the observer from the storm? Assume that the speed of sound in air is 331m/s? Why do you think that the thunder roars for sometime after the lighting flash?
Lesson Fourteen: Refraction of sound
Objectives:
- Describe how sound waves refract.
- Identify the frequency of a waves do not change as the wave moves from one medium to another.
Starter Activity: You may pose the following questions to let students remind what they had learnt about refraction in the previous lessons. How do water waves refract? What are the conditions necessary for refraction of water waves to occur? After you hear their responses, continue your lesson pointing out the fact that like water waves, sound waves are also able to refract.
Main Activity: It is not easy to show in a school laboratory that sound waves can be refracted .However; there is ample natural evidence that sound waves are refracted. Have you ever noticed that sounds produced at ground level can be more easily heard during the night than during the day? This is explained by refraction.
In order for refraction of sound to take place, the waves must be incident on the boundary between two media in which the speed of sound has different value.
The refraction and reflection of sound on the interface between the layers of the air having different temperatures makes the propagation of sound in the atmosphere complex. Echoes are common examples of the reflection of sound, but its refraction, which has been found to take place in the atmosphere when particularly loud sounds are transmitted over a large distance, is less common.
For example, at night the air near the ground is cooler than the air higher up. Thus the sound waves travel faster as they go higher and the separation between the wavefronts increases at greater heights as shown in the figure below (figure 4.23). The direction of travel of the sound energy is shown by the sound rays corresponding to these wavefronts; the sound waves are refracted downwards towards the ground.
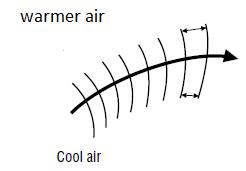
Figure 4.23
During the day the layers of air near the ground is warmer than the air higher up; so the wavefront is bent upwards over the head of the listener. Since the temperature falls with height, so does the speed of sound waves; they slow down.Therfore the sound waves bend towards the normal as they rise.
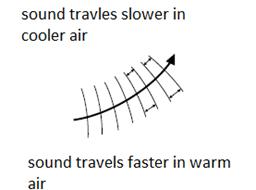
Figure 4.24
It is possible to observe during refraction velocity and wavelengths of waves change where as frequency of waves remain constant. Velocity and wavelength of wave coming from deep part of water tank to shallow part decrease. The diagram shown below (figure 4.25) shows this change in the velocity and wavelength of waves.
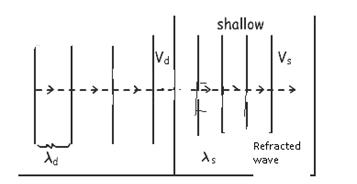
Figure 4.25
Concluding Activity: After you sum up the main ideas of the lesson .let students submit group report on the following conceptual questions.
- Why does sound travel further on cool nights than on warm days?
- How can relatively low sounds (e.g. normal conversation) travel long distances over water?
Lesson Fifteen: Diffraction of sound
Objectives:
- Cite evidence that sound waves undergo diffraction.
- Describe an experiment to show that sound waves are diffracted.
- State the right conditions for sound waves to be diffracted.
Starter Activity: You can initiate the class reviewing the past lessons as: Since sound is a wave motion, it will undergo diffraction given the right conditions. You can carry out the following demonstration as a starter activity.
Close all the widows and doors of a room Ask one of the students to speak normally in the room from a position directly behind the closed door, but a few meters away from it as shown in the figure 4.26. Ask someone else to listen at various positions A,B and C,outside the room and to report on whether he or she can hear what the person inside is saying.
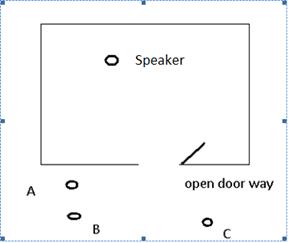
Figure 4.26
You will observe that not much is heard. Now repeat the experiment with door open. You should find that the speaker in the room is heard clearly from position C, and again from position B and possibly from position A.
The sound is heard at C because the waves pass straight through the open doorway. The sound is heard at B because the sound waves reach the listener after diffraction at the doorway. Similarly the sound is heard at A because of diffraction; the waves have been diffracted more than those reaching B.
Main Activity: Sound bends around corners and when it passes through an open door it doesn’t just remain in a narrow beam but spreads out in all directions. The wavelength of sound waves varies from about 20 cm to 10 m. The wavelengths which are similar in size to, or larger than, the aperture they are passing through are diffracted most.
Being able to hear round a corner is an everyday experience that indicates sound is easily diffracted.
The spreading of waves is greatest when the length of the wave is approximately the width of the opening. The wavelengths of humans’ speech are in the range 1-4 meter. Since the wavelength of human speech are comparable to the dimensions of doors and windows ,a substantial amount of diffraction occurs enabling us to hear people who are talking even though they may be standing around a corner or outside a door.
While the wavelength of visible light is so small compared to the dimensions of doors and windows ,little diffraction of light occurs ,making it impossible to see people if they are standing around a corner even though we may hear them speak.
Concluding Activity: After you sum up the basic underlying concepts of the lesson; give them an assignment to browse internet and share ideas among the students in class.
Lesson Sixteen: Interference of sound waves
Objectives:
- Describe the effects of interference of sound waves.
- Distinguish between constructive and destructive interferences.
Starter Activity: You can begin the lesson reviewing the previous lessons on interference of water waves. Let student apply the concepts learnt to answer this question-What happens to the medium at a point where two sound waves traveling are present simultaneously?
Main Activity: one of the most basic characteristics of waves is the ability of two waves to combine into a single wave whose displacement is given by the principle of superposition. This superposition or combination of waved is referred to as interference.
When we combine two in-phase waves, using the principle of superposition, the net displacement at each point is twice the displacement of each individual wave. The superposition of two waves to create a wave with amplitude larger than either individual wave is called constructive interference. A superposition of two waves that creates a wave with amplitude smaller than either individual wave is called destructive interference.
Demonstration to illustrate constructive and destructive interference
Place the two speakers facing the same way, about 0.5 m to 1 m apart and use frequencies of around 3000 Hz. Walk slowly parallel to the speakers and a couple of meters from them, with no intervening objects alternate constructive and destructive interference.
Consider the two loudspeakers in the figure. The sound wave from loudspeaker 2 passes just to the side of loudspeaker 1, hence two overlapped sound waves travel to the right along the x-axis. We want to find out what happens when two overlapped waves travel in the same direction along the same axis.
The figure 4.27 shows a point on the axis where the overlapped waves are detected by your ear or by a microphone.
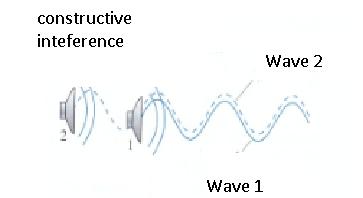
Figure 4.27
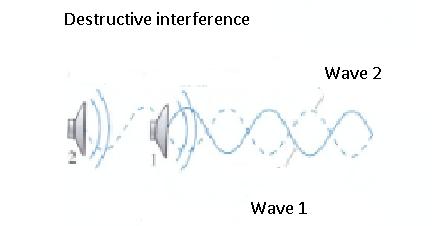
Figure 4.28
Concluding Activity: Recapitulate the underlying concept of the lesson highlighting the point that since sound is a wave motion sound waves superpose rather than collide when they meet, according to the principle of superposition. They pass through each other and the effects are additive. Assign students in group to state experiences which indicate the effects of interference of sound waves.
Lesson Seventeen: Intensity of sound waves
Objectives:
- Define what is meant by intensity of sound wave.
- Apply the definition to determine the intensity of a wave.
Starter Activity: You may wish to initiate this lesson by reminding students the point that sound carries energy. It may be a small amount, as when someone whispers in your ear, or it may be much more, as when the thunder cracks. Sound intensity is used to characterize the power of sound. It is defined as the power of the sound passing perpendicularly through a surface area.
Main Activity:
The intensity of sound is the amount of sound power, the rate at which the energy being transported, in a wave as it passes perpendicularly through a surface area. Because sound waves spread as they travel, the intensity of sound weakens as you move farther away from a sound source. The power of the sound coming out of the horn has spread over a greater area for the second listener. From everyday experience we know that the intensity of sound decreases as we move further from the source. We hear a less intense sound.
Sound intensity equals power divided by the surface area. The power must pass perpendicularly through the area. The units are watts per meter squared.
When sound travels freely in every direction, its intensity diminishes with the square of the distance from the sound source.
I=P/4πr2
Where
P = power of sound source
r = distance from sound source
Note that The denominator of the expression for intensity is 4πr2, the expression for the surface area of a sphere.

Figure 4.29
Worked Example:
A point source emits sound waves with an average power output of 80Watts.
- Calculate the intensity 3m from the source.
- Determine he distance at which the intensity of the sound is 1X10⁻⁸ W/m2 .
A point source emits energy in all directions, in the from of spherical waves and applying the equation,
I=P/4πr2
I= 80W/4π (3m)2
I=0.71m W/m2
Using the value we obtained for I in the equation, and solving for r gives:
r = .png)
Substituting the corresponding values,
r = 2.5 X10⁴ m.
Concluding Activity:
After you make a summary of the lesson, have students come up with the solution of the following problems on the intensity of sound waves. If students have trouble with the problems, motivate them reread their textbook, ask their teacher to help them approach solving problems with confidence, or discuss the material with a fellow student.
- You are standing 8m meters from a sound source that radiates equally in all directions, but it is too loud for you. How far away from the source should you stand to experience one third the intensity that you did at 8 meters?
- 17 meters from a sound source that radiates freely in all directions, the intensity is 0.00460 W/m2. What is the rate at which the source is emitting sound energy?
- Sound spreads radially in all directions from a source with power 20 W. If the intensity you experience is 3.00×10⁻⁶ W/m2, how far away are you from the source?
References:
- Randal Knight, Principles of physics, kinetics books, 2007
- James Cunningham and Norman Herr, Hands-on Physics Activities, Wiley.1985
- Serway Jewett,Physics for scientists and Engineers, ,Thomson Books,2004
- Department of Education and Science: Teachers’ Reference Handbook, Physics, Intervention Projects in Physics and Chemistry
- Folcroft and Lewis, Physics for IGSCE,Heinemann,1987
- Paul G.Hewitt, Conceptual physics,Pearson,2002